しおしお

IntelliJ IDEAのことなんかを書いてます

KtorでHello World

Ktor触ったことなかったので、IntelliJ IDEAのプラグイン使ってさくっと動かしてみた。

準備

IntelliJ IDEA(使ったバージョン2018.3)にKtor - Plugins | JetBrainsをインストールします。

プラグイン使って雛形プロジェクトの作成

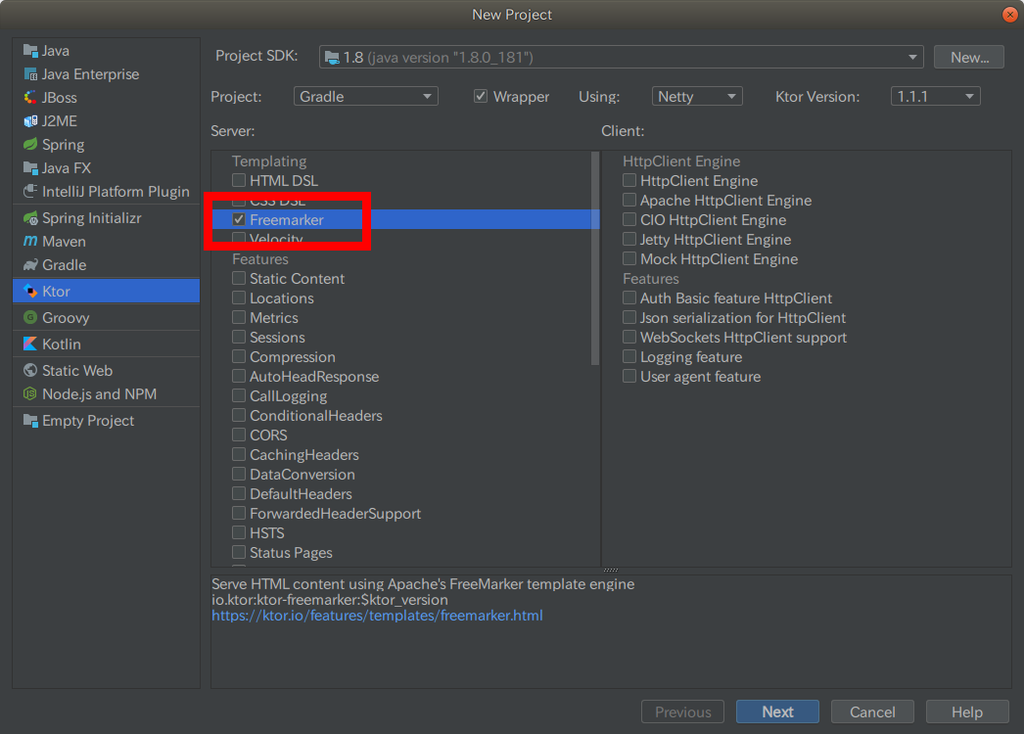
IntelliJ IDEA - Quick Start - Ktorを参考にプロジェクトを作成します。
画面にHello World表示するのに必要そうなFreemarkerにチェックをします。
f:id:sioiri:20190120062943p:plain
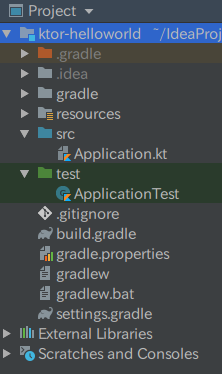
プロジェクトはこんな感じに生成されます。ディレクトリの構成はGradleの構成とはちょっと変えてるみたいですね。
f:id:sioiri:20190120063454p:plain

出力されたソースコード

HELLO WORLDをtext/plainで返すルートと画面を返すルートが定義されています。

    routing {
        get("/") {
            call.respondText("HELLO WORLD!", contentType = ContentType.Text.Plain)
        }

        get("/html-freemarker") {
            call.respond(FreeMarkerContent("index.ftl", mapOf("data" to IndexData(listOf(1, 2, 3))), ""))
        }
    }

動かしてみる

アプリケーションを起動してみます。ログから8080ポートでアプリケーションが起動されたことが確認できます。

2019-01-20 06:40:16.468 [main] INFO  Application - No ktor.deployment.watch patterns specified, automatic reload is not active
2019-01-20 06:40:17.795 [main] INFO  Application - Responding at http://0.0.0.0:8080

ブラウザでアクセスすると、HELLO WORLDが表示されます。
f:id:sioiri:20190120064218p:plain

View(FreeMarker)でHello Worldしてみる

メッセージを保持するクラスを追加します。

data class Message(val text: String)

ルーティングのFreeMarkerの実装を変更し、Hello Worldメッセージを保持するオブジェクトをmodelに設定します。

    routing {
        get("/") {
            call.respondText("HELLO WORLD!", contentType = ContentType.Text.Plain)
        }

        get("/hello") {
            call.respond(FreeMarkerContent("index.ftl", mapOf("message" to Message("Hello World!!!"))))
        }
    }

最後に、レスポンスで指定しているindex.ftl(resources/templates/index.ftl)をメッセージを表示するように変更します。

<#-- @ftlvariable name="message" type="siosio.Message" -->
<html>
    <body>
    メッセージ:${message.text}
    </body>
</html>

動かしてみる

ブラウザでアクセスすると、メッセージとしてHello Worldが表示されました。ちゃんと動きましたね。
f:id:sioiri:20190120065314p:plain

Hello Worldを返すAPIを追加してみる

今までは画面だったので、最後にJsonHello Worldを返すAPIを追加してみます。
HTTP API - Quick Start - Ktorを参考にするのとイケそうですね。

Jsonを返すためにJackson機能を有効にする

ktor-jacksonをbuild.gradleのdependenciesに追加します。

compile "io.ktor:ktor-jackson:$ktor_version"

Application.ktに以下を追加して、jacksonをアプリケーションにインストールします。

fun Application.module(testing: Boolean = false) {
    // 省略
    install(ContentNegotiation) {
        jackson {
            // 確認しやすくするためにインデントして
            enable(SerializationFeature.INDENT_OUTPUT)
        }
    }
    // 省略
}

ルートを追加する

hello_jsonにアクセスするとJsonHello Worldを返すようにしてみます。

        get("/hello_json") {
            call.respond(Message("Hello World!"))
        }

動かしてみると

Jsonでちゃんと返してきてくれましたね。
f:id:sioiri:20190120071400p:plain

Spring Session & RedisでJacksonを使ったシリアライズを試してみる

Spring SessionでRedisにセッション情報を格納する際に、Jacksonを使ってシリアライズをできるみたいなので試してみました。*1

ライブラリのバージョンなど

build.gradleを参照ください。

Sessionの格納先をRedisにする

application.propertiesに以下を追加します。

spring.session.store-type=redis

Jackson2JsonRedisSerializerをBean定義する

RedisHttpSessionConfigurationを見ると、こんな実装がるのでBean名にspringSessionDefaultRedisSerializerを指定してJacksonのシリアライザをBean定義すれば良さそうですね。

	@Autowired(required = false)
	@Qualifier("springSessionDefaultRedisSerializer")
	public void setDefaultRedisSerializer(
			RedisSerializer<Object> defaultRedisSerializer) {
		this.defaultRedisSerializer = defaultRedisSerializer;
	}

実際のBean定義です。Jacksonでシリアライザを行うJackson2JsonRedisSerializerを返します。
@Qualifierアノテーションを使ってBean名にspringSessionDefaultRedisSerializerを指定します。
JacksonのObjectMapperには、セッション情報をシリアライズする際に必要となるためSecurityJackson2Modulesを使って、必要なModuleを登録してあげます。

    @Bean
    @Qualifier("springSessionDefaultRedisSerializer")
    fun redisSerializer(): RedisSerializer<Any> {
        return Jackson2JsonRedisSerializer(Any::class.java).apply {
            val objectMapper = ObjectMapper()
            objectMapper.registerModules(SecurityJackson2Modules.getModules(this.javaClass.classLoader))
            setObjectMapper(objectMapper)
        }
    }

ログインを行いRedisの中身を確認する

ログインを行ってセッションの中身を確認してみると、デフォルトで使われるUserクラスの情報がRedisに登録されていることが確認できます。

127.0.0.1:6379> hgetall spring:session:sessions:6ff0be42-853f-4184-a874-1e4881a822f7
creationTime
1547242900218
sessionAttr:SPRING_SECURITY_SAVED_REQUEST

sessionAttr:org.springframework.security.web.csrf.HttpSessionCsrfTokenRepository.CSRF_TOKEN

maxInactiveInterval
1800
lastAccessedTime
1547242908403
sessionAttr:SPRING_SECURITY_LAST_EXCEPTION

sessionAttr:SPRING_SECURITY_CONTEXT
{"@class":"org.springframework.security.core.context.SecurityContextImpl","authentication":{"@class":"org.springframework.security.authentication.UsernamePasswordAuthenticationToken","authorities":["java.util.Collections$UnmodifiableRandomAccessList",[{"@class":"org.springframework.security.core.authority.SimpleGrantedAuthority","authority":"ROLE_USER"}]],"details":{"@class":"org.springframework.security.web.authentication.WebAuthenticationDetails","remoteAddress":"0:0:0:0:0:0:0:1","sessionId":"272fd950-13c5-4d79-a3dc-54010be92ad7"},"authenticated":true,"principal":{"@class":"org.springframework.security.core.userdetails.User","password":null,"username":"test","authorities":["java.util.Collections$UnmodifiableSet",[{"@class":"org.springframework.security.core.authority.SimpleGrantedAuthority","authority":"ROLE_USER"}]],"accountNonExpired":true,"accountNonLocked":true,"credentialsNonExpired":true,"enabled":true},"credentials":null}}

UserDetailsの実装クラスを変えてみる

デフォルトで使われるorg.springframework.security.core.userdetails.Userではなく、独自のUserDetails実装を使った場合の動きを確認してみます。

UserDetails実装はSampleUserとしてデフォルトの情報以外に、ログインしたユーザの名前を保持するようにしています。

data class SampleUser(private val username: String,
                      private val password: String,
                      private val authorities: List<GrantedAuthority>,
                      val loginUserName: String) : UserDetails {

    override fun getAuthorities(): List<GrantedAuthority> = authorities

    override fun isEnabled(): Boolean = true

    override fun getUsername(): String = username

    override fun isCredentialsNonExpired(): Boolean = true

    override fun getPassword(): String = password

    override fun isAccountNonExpired(): Boolean = true

    override fun isAccountNonLocked(): Boolean = true
}

独自Userでも動作するか確認してみます

残念ながらエラーになってしまいました。デシリアライズ処理ができなかったようです。

org.springframework.data.redis.serializer.SerializationException: Could not read JSON: The class with siosio.springsessionredisexample.config.SampleUser and name of siosio.springsessionredisexample.config.SampleUser is not whitelisted. If you believe this class is safe to deserialize, please provide an explicit mapping using Jackson annotations or by providing a Mixin. If the serialization is only done by a trusted source, you can also enable default typing. See https://github.com/spring-projects/spring-security/issues/4370 for details (through reference chain: org.springframework.security.core.context.SecurityContextImpl["authentication"]); nested exception is com.fasterxml.jackson.databind.JsonMappingException: The class with siosio.springsessionredisexample.config.SampleUser and name of siosio.springsessionredisexample.config.SampleUser is not whitelisted. If you believe this class is safe to deserialize, please provide an explicit mapping using Jackson annotations or by providing a Mixin. If the serialization is only done by a trusted source, you can also enable default typing. See https://github.com/spring-projects/spring-security/issues/4370 for details (through reference chain: org.springframework.security.core.context.SecurityContextImpl["authentication"])
	at org.springframework.data.redis.serializer.Jackson2JsonRedisSerializer.deserialize(Jackson2JsonRedisSerializer.java:75) ~[spring-data-redis-2.1.3.RELEASE.jar:2.1.3.RELEASE]
	at org.springframework.data.redis.core.AbstractOperations.deserializeHashValue(AbstractOperations.java:354) ~[spring-data-redis-2.1.3.RELEASE.jar:2.1.3.RELEASE]
	at org.springframework.data.redis.core.AbstractOperations.deserializeHashMap(AbstractOperations.java:298) ~[spring-data-redis-2.1.3.RELEASE.jar:2.1.3.RELEASE]
	at org.springframework.data.redis.core.DefaultHashOperations.entries(DefaultHashOperations.java:247) ~[spring-data-redis-2.1.3.RELEASE.jar:2.1.3.RELEASE]
	at org.springframework.data.redis.core.DefaultBoundHashOperations.entries(DefaultBoundHashOperations.java:183) ~[spring-data-redis-2.1.3.RELEASE.jar:2.1.3.RELEASE]
	at org.springframework.session.data.redis.RedisOperationsSessionRepository.getSession(RedisOperationsSessionRepository.java:466) ~[spring-session-data-redis-2.1.2.RELEASE.jar:2.1.2.RELEASE]
	at org.springframework.session.data.redis.RedisOperationsSessionRepository.findById(RedisOperationsSessionRepository.java:435) ~[spring-session-data-redis-2.1.2.RELEASE.jar:2.1.2.RELEASE]

なお、Redisの内容を確認してみると、想定通りSampleUserの情報が格納されているのでシリアライズは問題なさそうですね。

sessionAttr:SPRING_SECURITY_CONTEXT
{"@class":"org.springframework.security.core.context.SecurityContextImpl","authentication":{"@class":"org.springframework.security.authentication.UsernamePasswordAuthenticationToken","authorities":["java.util.Collections$UnmodifiableRandomAccessList",[{"@class":"org.springframework.security.core.authority.SimpleGrantedAuthority","authority":"ROLE_USER"}]],"details":{"@class":"org.springframework.security.web.authentication.WebAuthenticationDetails","remoteAddress":"0:0:0:0:0:0:0:1","sessionId":"0f181292-9a16-4622-b820-83adcc8ae33c"},"authenticated":true,"principal":{"@class":"siosio.springsessionredisexample.config.SampleUser","username":"test","password":"$2a$10$AXwQIZKK8yaNk2tFN1JwaOCxcn7DYuCwK5d6wvY.tX.ZGQUWeA2sy","authorities":["java.util.Collections$SingletonList",[{"@class":"org.springframework.security.core.authority.SimpleGrantedAuthority","authority":"ROLE_USER"}]],"loginUserName":"テストユーザ","enabled":true,"accounpired":true,"credentialsNonExpired":true,"accountNonLocked":true},"credentials":null}

シリアライズ処理がうまく動くようMixInを追加する

デフォルトのUserクラス用のMixIn(org.springframework.security.jackson2.UserMixin)を参考にしてデシリアライズ処理を行うクラスなどを追加します。
SampleUserMixinでは、デシリアライズを行うクラスの指定や、フィールドをシリアライズ対象にするなどの設定をしています。
シリアライズを行うSampleUserDeserializerは、SampleUserを生成して返します。

data class SampleUser(private val username: String,
                      private val password: String,
                      private val authorities: List<GrantedAuthority>,
                      val loginUserName: String) : UserDetails {

    override fun getAuthorities(): List<GrantedAuthority> = authorities

    override fun isEnabled(): Boolean = true

    override fun getUsername(): String = username

    override fun isCredentialsNonExpired(): Boolean = true

    override fun getPassword(): String = password

    override fun isAccountNonExpired(): Boolean = true

    override fun isAccountNonLocked(): Boolean = true
}

@JsonTypeInfo(use = JsonTypeInfo.Id.CLASS, include = JsonTypeInfo.As.PROPERTY)
@JsonDeserialize(using = SampleUserDeserializer::class)
@JsonAutoDetect(
        fieldVisibility = JsonAutoDetect.Visibility.ANY,
        getterVisibility = JsonAutoDetect.Visibility.NONE,
        isGetterVisibility = JsonAutoDetect.Visibility.NONE,
        creatorVisibility = JsonAutoDetect.Visibility.NONE)
@JsonIgnoreProperties(ignoreUnknown = true)
@JsonSubTypes
internal abstract class SampleUserMixin

class SampleUserDeserializer : JsonDeserializer<SampleUser>() {
    override fun deserialize(jp: JsonParser, ctxt: DeserializationContext): SampleUser {
        val mapper = jp.codec as ObjectMapper
        val jsonNode: JsonNode = mapper.readTree(jp)
        val authorities = mapper.convertValue<List<SimpleGrantedAuthority>>(jsonNode.get("authorities"))

        val password = jsonNode.readText("password")
        return SampleUser(
                jsonNode.readText("username"),
                password,
                authorities.toList(),
                jsonNode.readText("loginUserName")
        )
    }

    fun JsonNode.readText(field: String, defaultValue: String = ""): String {
        return when {
            has(field) -> get(field).asText(defaultValue)
            else -> defaultValue
        }
    }
}

最後に、JacksonのシリアライザのBean生成を行っているところで、作成したMixInをJacksonに登録します。

    @Bean
    @Qualifier("springSessionDefaultRedisSerializer")
    fun redisSerializer(): RedisSerializer<Any> {
        return Jackson2JsonRedisSerializer(Any::class.java).apply {
            val objectMapper = ObjectMapper()
            objectMapper.registerModules(SecurityJackson2Modules.getModules(this.javaClass.classLoader))
            objectMapper.addMixIn(SampleUser::class.java, SampleUserMixin::class.java)
            setObjectMapper(objectMapper)
        }
    }

MixInの確認

ログイン後に呼び出されるコントローラで下のようにUser情報を受けとり確認してみます。

    @GetMapping
    fun menu(@AuthenticationPrincipal user: SampleUser): String {
        println("user = ${user}")
        return "menu"
    }

ログインしてみると標準出力にユーザ情報が出力されるのでJacksonでのシリアライズ&デシリアライズが動いていることがわかります。
f:id:sioiri:20190112075143p:plain

最後に…

ソース全体はこちら→GitHub - siosio/spring-session-redis-example

*1:デフォルトでは、ObjectOutputStreamを使ったシリアライズが行われます。

IntelliJのDocker integrationプラグインからExecした時に保存されるコマンド履歴を削除する方法

IntelliJさんのDocker Integrationプラグインを使うとIDE上からdocker execできて便利ですよね。

でも、コマンド名間違えちゃった場合にそれが記憶されて、次にExecしようとした時に誤ったコマンド名が候補に出てくるの邪魔ですね…
f:id:sioiri:20190107143536p:plain

そんなときは設定ファイルを直接いじって削除してあげましょう。

.idea/workspace.xmlを開いて、DockerExecCommandを検索します。
下のように誤ったコマンドの設定がDockerExecCommandのcomponent内にあるので、それを削除してあげます。

    <ExecCommand>
      <option name="command" value="hoge" />
      <option name="imageId" value="redis:latest" />
    </ExecCommand>

Gradle 5.0でMavenのBOMを使おう

Managing Transitive Dependenciesあたりをお試ししてみました。

implementation platformを使ってみる

build.gradle

BOMをimplementation platformに指定します。
BOMで定義されているバージョンを使用するので、個別のライブラリ(この例ではjackson-databind)にはバージョン指定は不要となります。

dependencies {
  implementation platform('com.fasterxml.jackson:jackson-bom:2.9.7')
  implementation 'com.fasterxml.jackson.core:jackson-databind'
}

dependenciesの結果

バージョンを指定しなくても、BOMのバージョンが適用されていますね

+--- com.fasterxml.jackson:jackson-bom:2.9.7
|    +--- com.fasterxml.jackson.core:jackson-annotations:2.9.0
|    +--- com.fasterxml.jackson.core:jackson-core:2.9.7
|    \--- com.fasterxml.jackson.core:jackson-databind:2.9.7
|         +--- com.fasterxml.jackson.core:jackson-annotations:2.9.0
|         \--- com.fasterxml.jackson.core:jackson-core:2.9.7
\--- com.fasterxml.jackson.core:jackson-databind -> 2.9.7 (*)

個別のライブラリに明示的にバージョンを指定してみると

明示的に新しいバージョンを指定してみます。

dependencies {
  implementation platform('com.fasterxml.jackson:jackson-bom:2.9.7')
  implementation 'com.fasterxml.jackson.core:jackson-databind:2.9.8'
}

dependenciesを見てみると、明示的に指定したバージョンが適用されています。
このように、明示的にバージョンが指定された場合でもBOMバージョンを強制したい場合には、enforcedPlatformを使う必要があります。

+--- com.fasterxml.jackson:jackson-bom:2.9.7
|    +--- com.fasterxml.jackson.core:jackson-annotations:2.9.0
|    +--- com.fasterxml.jackson.core:jackson-core:2.9.7 -> 2.9.8
|    \--- com.fasterxml.jackson.core:jackson-databind:2.9.7 -> 2.9.8
|         +--- com.fasterxml.jackson.core:jackson-annotations:2.9.0
|         \--- com.fasterxml.jackson.core:jackson-core:2.9.8
\--- com.fasterxml.jackson.core:jackson-databind:2.9.8 (*)

implementation enforcedPlatformを使ってみる

build.gradle

platformenforcedPlatformにBOMを指定します。

dependencies {
  implementation enforcedPlatform('com.fasterxml.jackson:jackson-bom:2.9.7')
  implementation 'com.fasterxml.jackson.core:jackson-databind:2.9.8'
}

dependenciesの結果

個別指定のバージョンが、BOMに定義されているバージョンで上書きされるようになしました。

+--- com.fasterxml.jackson:jackson-bom:2.9.7
|    +--- com.fasterxml.jackson.core:jackson-annotations:2.9.0
|    +--- com.fasterxml.jackson.core:jackson-core:2.9.7
|    \--- com.fasterxml.jackson.core:jackson-databind:2.9.7
|         +--- com.fasterxml.jackson.core:jackson-annotations:2.9.0
|         \--- com.fasterxml.jackson.core:jackson-core:2.9.7
\--- com.fasterxml.jackson.core:jackson-databind:2.9.8 -> 2.9.7 (*)

Gradle4.6-RC1でお試し追加されたBOM対応を動かしてみると

Gradle4.6 RC1で追加されたお試し版は動かないですね!

+--- com.fasterxml.jackson:jackson-bom:2.9.7
\--- com.fasterxml.jackson.core:jackson-databind FAILED

Spring Cloud Configを使ってみる

Spring Cloud Configを使って、アプリケーションが使う環境毎に異なる設定値をちゃんと構成管理してみる。

Spring Cloud Configは、設定値をAPIで配信するConfig Serverが必要となる。アプリケーションは、Config Serverから環境に応じた設定値を取得して動作する感じになる。

Config Serverを作ってみる

Config Serverは、org.springframework.cloud:spring-cloud-config-serverを追加するだけで簡単に作成できる。
Gradleの場合はこんな感じになる。

dependencies {
  implementation('org.springframework.cloud:spring-cloud-config-server')
}

あとは、Spring Bootのアプリケーションと同じように起動クラスを作るだけで良い。
ポイントは、@SpringBootApplicationアノテーションだけではなく@EnableConfigServerをつけていること。

@EnableConfigServer
@SpringBootApplication
class ConfigServer

fun main(args: Array<String>) {
    runApplication<ConfigServer>(*args)
}

application.propertiesには、設定値が置かれたリポジトリの情報を設定する。

server.port=8888
spring.cloud.config.server.git.uri=git@bitbucket.org:siosio/config.git
spring.cloud.config.server.git.private-key=${key}
spring.cloud.config.server.git.passphrase=${pass}

設定値を保持するpropertiesファイルを作って、gitにpushする。
propertiesファイルの名前は、<アプリケーション名>-<プロファイル名>.propertiesとして、ルートディレクトリにおいておく。*1

今回は、application-dev.propertiesとしておく。

hello.message=hello!!!

設定値を使うアプリケーションを作ってみる

アプリケーション側には、spring-cloud-starter--configを追加する。あとは、Config Serverで管理している設定を変更した時にアプリケーション側の値をリフレッシュするためにspring-boot-starter-actuatorも追加しておく。

implementation 'org.springframework.cloud:spring-cloud-starter--config'
implementation 'org.springframework.boot:spring-boot-starter-actuator'

設定値を保持するコンポーネントを定義します。
これで、Config Serverから取得したhello.messageの値がmessageプロパティに保持されます。

@ConfigurationProperties(prefix = "hello")
@Component
class HelloProperties {
    lateinit var message: String
} 

Config Serverで管理している設定値が使えていることを確認するAPIを作ります。
Propertiesクラスで保持している設定値と、@Valueで直接設定値をインジェクションした場合の確認をします。

@RestController
@RequestMapping("/hello")
class HelloController(
        private val prop: HelloProperties,
        @Value("\${hello.message}") private val message: String
) {

    @GetMapping
    fun hello(): Res {
        return Res(prop.message, message)
    }
}

data class Res(
        val propMessage: String,
        val valueMessage: String
)

resources/bootstrap.propertiesを作成して、Config Serverの指定などをします。
spring.application.nameに、Config Serverのpropertiesファイル名に指定したアプリケーション名を設定します。
spring.cloud.config.uriに、Config Serverのuriを指定します。(デフォルトは、http://localhost:8888になっています)

spring.application.name=application
spring.cloud.config.uri=http://localhost:8888

動かしてみる

Config Serverのpropertiesファイル名に指定したプロファイル(dev)をアクティブにしてアプリケーションを起動します。

java -jar -Dspring.profiles.active=dev web-app-0.0.1-SNAPSHOT.jar

curlAPIを叩いてみると、Config Serverで管理されている値が返されることがわかります。

curl http://localhost:8080/hello
{"propMessage":"hello!!!","valueMessage":"hello!!!"}

Config Serverで管理されている設定値を変更し、アプリケーション側で設定値を再読込してみます。
設定値をmod hello!!!に変更してみます。

$ cat application-dev.properties 
hello.message=mod hello!!!

$ git commit -a -m mod
[master bed53e2] mod
 1 file changed, 1 insertion(+), 1 deletion(-)
git push origin master

actuatorのrefreshエンドポイントを叩いて、設定値を再読込します。
アプリケーション側には、再読込したよを示すログが出力されます。

$ curl -X POST http://localhost:8080/actuator/refresh
["config.client.version","hello.message"]

再度APIを叩いてみると、Propertiesクラスが持つ設定値は最新化されていますが、@Value でインジェクションした値は変わっていないことがわかります。

$ curl http://localhost:8080/hello
{"propMessage":"mod hello!!!","valueMessage":"hello!!!"}

@Valueでインジェクションした値も再読込したい場合は、下のように該当クラスに@RefreshScopeをつけてあげます。

@RestController
@RequestMapping("/hello")
@RefreshScope
class HelloController(
        private val prop: HelloProperties,
        @Value("\${hello.message}") private val message: String
)

@RefreshScopeをつけたことで、refresh後に@Valueの値も最新化されるようになりました。

$ curl http://localhost:8080/hello
{"propMessage":"mod hello!!!","valueMessage":"mod hello!!!"}
$ cat application-dev.properties 
hello.message=mod mod hello!!!

$ git commit -a -m mod
[master a468229] mod
 1 file changed, 1 insertion(+), 1 deletion(-)
siosio@siosio:~/IdeaProjects/temp/config$ git push origin master

$ curl -X POST http://localhost:8080/actuator/refresh
["config.client.version","hello.message"]

$ curl http://localhost:8080/hello
{"propMessage":"mod mod hello!!!","valueMessage":"mod mod hello!!!"} 

おわり。

*1:ファイルの命名規則は、 Spring Cloud Configを参照

VeeValidateで入力値のバリデーションをしてみる

VeeValidateのインストール

現時点の最新版は、2.1.3になります。

npm install vee-validate --save

VeeValidateをVueに追加する

import Vue from 'vue';
import VeeValidate from 'vee-validate';

Vue.use(VeeValidate);

入力フォームにバリデーションルールの設定とメッセージを表示してみる

  • バリデーションのルールはv-validate属性に指定する。指定可能なルールは、こちら
  • バリデーションエラーの表示は、errors.firstで引数には、バリデーション対象の項目のname属性の値を指定する
  • バリデーションエラーの有無は、errors.hasにname属性を指定することで確認できる
  • 複数のルールを設定する場合は、|で繋いで設定する
<form>
  <div>
    <input type="text" name='name' placeholder="名前" v-validate="'required'"/>
    <span v-if="errors.has('name')">{{ errors.first('name') }}</span>
  </div>

  <div>
    <input type="email" placeholder="メールアドレス" v-validate="'required|email'" name="mail"/>
    <span v-if="errors.has('mail')">{{ errors.first('mail') }}</span>
  </div>

  <div>
    <button @click="submit">登録</button>
  </div>
</form>

デフォルトでは、こんな感じに英語のメッセージが表示される
f:id:sioiri:20181118072642p:plain

メッセージを日本語化する

  • Validator.localizeを呼び出して、言語とそれに対応したメッセージを登録する
import VeeValidate, {Validator} from 'vee-validate';
import ja from 'vee-validate/dist/locale/ja';

Vue.use(VeeValidate);
Validator.localize('ja', ja);

この状態では、メッセージは日本語化されるけど対象の項目名は英語のままとなる
f:id:sioiri:20181118074005p:plain

項目名も日本語化する場合は、バリデーション対象の要素のdata-vv-as属性に項目名を設定する

<div>
  <input type="text" name='name' placeholder="名前" v-validate="'required'" data-vv-as="名前"/>
  <span v-if="errors.has('name')">{{ errors.first('name') }}</span>
</div>

<div>
  <input type="email" placeholder="メールアドレス" v-validate="'required|email'" name="mail" data-vv-as="メールアドレス"/>
  <span v-if="errors.has('mail')">{{ errors.first('mail') }}</span>
</div>

これでメッセージが完全に日本語になる
f:id:sioiri:20181118074746p:plain

このようにすると、グローバルに項目名を設定できる。グローバルに設定した項目名を上書きしたい場合には、上に書いたdata-vv-as属性を使うと良い

Validator.localize({
  ja: {
    attributes: {
      name: 'なまえ'
    }
  }
});

バリデーションが行われるイベントを変更する

デフォルトだとinputイベントでバリデーションが実行される。これを、他のイベントに変更することができます。inputだと、入力中にエラーメッセージが表示されたりしてちょっと鬱陶しい気がするので変更したほうが良さげかなと。

  • イベントは、VeeValidateを登録するときのオプションでeventsを指定することで変更できる
Vue.use(VeeValidate, {
  events: 'change'
});

サブミット時にバリデーションを実行する

サブミット時にはバリデーションが実行されないので、サブミット時に強制的にバリデーションを行うようにする。

  • バリデーションは、サブミット処理のメソッド内でthis.$validator.validate()を呼び出すと実行される
  • バリデーション結果は、引数で渡ってくるのでそれをもとにサブミットしていいのか判断すれば良い
  methods: {
    submit () {
      this.$validator.validate().then(result => {
        if (result) {
          alert('登録します');
        } else {
          alert('エラー');
        }
      });
    }
  }

カスタムバリデーションルールを作ってみる

  • Validator.extendの最初の引数にルール名、2番めにルールを設定するとカスタムルールを登録できる
Validator.extend('custom', {
  getMessage: (field) => {
    console.log(field);
    return `${field}の値が不正ですよ`;
  },
  validate: (value) => {
    return value === 1;
  }
});

結果はこんな感じになる。
f:id:sioiri:20181118172716p:plain

おわり。

IntelliJ IDEAのDatabase WindowからDoma2用Entityを生成する

IntelliJ IDEAのDatabase WindowsからDoma2用のEntityを生成してみたお話です。

IntelliJのデフォルトの状態だと下の画像のようにGenerated POJOsしか選択できません。ここに、Doma2用のEntityを生成するスクリプトを追加してEntityを生成できるようにします。
f:id:sioiri:20181004063440p:plain

Doma2のEntity生成用スクリプトIntelliJに登録する

DatabaseウィンドウからDoma2のエンティティテンプレートを生成するやつ · GitHubからGenerate Doma Entity.groovyをダウンロードして、IntelliJに登録します。
IntelliJへの登録は、下の画像のようにProjectウィンドウのScratches and Consolesの中のExtensions->Database Tools and SQL->schemaの中に配置するだけです。
f:id:sioiri:20181004083408p:plain

Entityを生成する

生成したいテーブルを右クリック->Scripted Extensions->Generate Doma Entity.groovyを選択します。保存場所を聞かれるので好きな場所を選びます。
f:id:sioiri:20181004090824p:plain

生成される内容

生成対象のテーブル定義
create table test_table
(
	id bigserial not null
		constraint test_table_id_pk
			primary key,
	name varchar(255) not null,
	age smallint not null,
	birthday date not null,
	created timestamp not null
)
生成されるEntity
package com.sample;

import org.seasar.doma.Entity;
import org.seasar.doma.Table;
import org.seasar.doma.Id;
import org.seasar.doma.GeneratedValue;
import org.seasar.doma.GenerationType;

@Entity(immutable = true)
@Table(name = "test_table")
public class TestTableEntity {
              
    @Id
    public final Long id;

    public final String name;

    public final Short age;

    public final java.time.LocalDate birthday;

    public final java.time.LocalDateTime created;

    public TestTableEntity(Long id, String name, Short age, java.time.LocalDate birthday, java.time.LocalDateTime created) {
        this.id = id;
        this.name = name;
        this.age = age;
        this.birthday = birthday;
        this.created = created;
    }

}

生成されるEntityで微妙なところ

  • パッケージ名がcom.sample固定なので、必ず変更が必要
  • PostgreSQLのserialが採番カラムとして判断できずGeneratedValueがつかない(他のデータベースの自動採番カラムは未確認)

おわり