しおしお

IntelliJ IDEAのことなんかを書いてます

java.nio.file.Files#linesのclose忘れをIntelliJさんに教えてもらおう

デフォルトの設定では、AutoCloseableのclose忘れを教えてもらえないので、教えてもらえるようにInspectionsの設定を変更してあげましょう

設定手順

下の画像の流れで選択して、 AutoCloseable used without 'try'-with-resources にチェックを入れてあげましょう。 これで、Files#linesだけではなくAutoCloseableのtry-with-resources外での利用やclose忘れを検知できるようになります。

f:id:sioiri:20190604083414p:plain

Inspectionの実行結果

ちゃんと警告出るようになりました!

f:id:sioiri:20190604083903p:plain

Ktor 1.2.0(rc)で追加されたThymeleaf Featureを試してみた

KtorでThymeleafを試す - しおしおを書いたけど、Ktor 1.2.0(今はまだrc)からThymeleafが使えるようになるみたいなので試してみた。

gradle関連

gradle.properties

  • Ktorのバージョンを1.2.0系に設定する
ktor_version=1.2.0-rc2

build.gradle

  • ktor-thymeleaf をdependenciesに追加する
implementation "io.ktor:ktor-thymeleaf:$ktor_version"

サーバサイド

  • Thymeleaf をインストールする
  • installに渡すブロック内では、 Thymeleaf に関する設定を行う
    • この例では、クラスパス配下のテンプレートを使用する設定としている
  • respondには、viewでThymeleafが使われるようにするためにThymeleafContentを指定する
    • ThymeleafContentにはテンプレートの名前と、テンプレート内で使用するモデルを指定する
@Suppress("unused") // Referenced in application.conf
fun Application.module() {
    install(Thymeleaf) {
        setTemplateResolver(ClassLoaderTemplateResolver().apply { 
            prefix = "templates/"
            suffix = ".html"
            characterEncoding = "utf-8"
        })
    }

    routing {
        get("/") {
            call.respond(ThymeleafContent("test", mapOf("users" to Users(listOf(User(1, "user1"), User(2, "user2"))))))
        }
    }
}

class Users(private val users: List<User>) : Iterable<User> {
    override fun iterator(): Iterator<User> {
        return users.iterator()
    }

}

data class User(val id: Long, val name: String)

テンプレート

  • サーバサイドで設定したモデルの内容を表示するだけのシンプルなものにしています
<!DOCTYPE html >
<html xmlns:th="http://www.thymeleaf.org">
<head>
  <meta charset="UTF-8">
  <title>Title</title>
</head>
<body>
<ul>
  <!--/*@thymesVar id="users" type="siosio.Users"*/-->
  <!--/*@thymesVar id="user" type="siosio.User"*/-->
  <li th:each="user : ${users}" th:text="${user.id + ':' + user.name}"></li>
</ul>
</body>
</html>

実行結果

動きましたね。

f:id:sioiri:20190512072958p:plain

KtorでThymeleafを試す

Ktor標準ではThymeleafに対応していなかったので、Thymeleaf使えるかどうか試してみた感じです。
※Ktor1.2以降からThymeleaf機能が追加されたようです→Ktor 1.2.0(rc)で追加されたThymeleaf Featureを試してみた - しおしお

Thymeleaf用のFeatureを作る

ktor/FreeMarker.kt at master · ktorio/ktor · GitHubを参考に…
やってることは、こんな感じです。

  • ClassLoaderTemplateResolver の生成と初期設定
  • アプリケーションからの戻りが ThymeleafContent の場合に、Thymeleafを使ったレンダリング
import io.ktor.application.ApplicationCallPipeline
import io.ktor.application.ApplicationFeature
import io.ktor.http.content.OutgoingContent
import io.ktor.response.ApplicationSendPipeline
import io.ktor.util.AttributeKey
import io.ktor.util.cio.bufferedWriter
import kotlinx.coroutines.io.ByteWriteChannel
import org.thymeleaf.TemplateEngine
import org.thymeleaf.context.Context
import org.thymeleaf.templateresolver.ClassLoaderTemplateResolver

class ThymeleafContent(
        val template: String,
        val model: Map<String, Any>?
)

class Thymeleaf(private val engine: TemplateEngine) {

    companion object Feature : ApplicationFeature<ApplicationCallPipeline, ClassLoaderTemplateResolver, Thymeleaf> {
        override val key: AttributeKey<Thymeleaf> = AttributeKey("thymeleaf")

        override fun install(pipeline: ApplicationCallPipeline,
                             configure: ClassLoaderTemplateResolver.() -> Unit): Thymeleaf {
            val config = ClassLoaderTemplateResolver(Thread.currentThread().contextClassLoader)
                    .apply {
                        prefix = "templates/"
                        suffix = ".html"
                        characterEncoding = "UTF-8"
                    }
                    .apply(configure)
            val engine = TemplateEngine()
            engine.setTemplateResolver(config)
            val feature = Thymeleaf(engine)
            pipeline.sendPipeline.intercept(ApplicationSendPipeline.Transform) { value ->
                if (value is ThymeleafContent) {
                    val response = feature.process(value)
                    proceedWith(response)
                }
            }
            return feature
        }
    }

    private fun process(content: ThymeleafContent): ThymeleafOutgoingContent {
        return ThymeleafOutgoingContent(
                engine,
                content
        )
    }

    private class ThymeleafOutgoingContent(
            val engine: TemplateEngine,
            val content: ThymeleafContent
    ) : OutgoingContent.WriteChannelContent() {
        override suspend fun writeTo(channel: ByteWriteChannel) {
            channel.bufferedWriter(Charsets.UTF_8).use {
                val context = Context().apply {
                    setVariables(content.model)
                }
                engine.process(content.template, context, it)
            }
        }
    }
}

アプリケーションを作る

サーバサイド

  • 上で作ったThymeleaf Featureを使えるようにするためにインストールする
  • 処理結果として、ThymeleafContentを返す
package siosio

import io.ktor.application.Application
import io.ktor.application.call
import io.ktor.application.install
import io.ktor.response.respond
import io.ktor.routing.get
import io.ktor.routing.routing

fun main(args: Array<String>): Unit = io.ktor.server.netty.EngineMain.main(args)

@Suppress("unused") // Referenced in application.conf
@kotlin.jvm.JvmOverloads
fun Application.module(testing: Boolean = false) {
    install(Thymeleaf)

    routing {
        get("/hello") {
            call.respond(ThymeleafContent("index", mapOf("user" to User(1, "しおしお"))))
        }
    }
}

data class User(val id: Long, val name: String)

Thymeleaf用テンプレート

単純にUserクラスの内容を出力しているだけですね

<!DOCTYPE html >
<html xmlns="http://www.w3.org/1999/xhtml"
      xmlns:th="http://www.thymeleaf.org" xml:lang="ja" lang="ja">
<head>
  <meta charset="UTF-8">
  <title>Title</title>
</head>
<body>

<!--/*@thymesVar id="user" type="siosio.User"*/-->
<ul>
  <li th:text="${user.id}"></li>
  <li th:text="${user.name}"></li>
</ul>
</body>
</html>

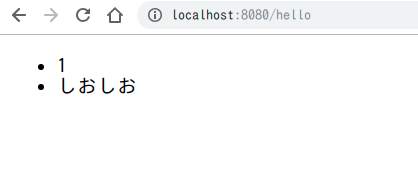
実行結果

動きましたね(๑•̀ㅂ•́)و✧
f:id:sioiri:20190422063613p:plain

elastic4sでcase classを使った登録と検索

elastic4sを使って↓を試してみました。

  • case classの内容をElasticsearchに登録する
  • 検索結果をcase classマッピングして取得する

build.sbt

build.sbtには、elastic4sを追加します。

val elastic4sVersion = "6.5.1"
libraryDependencies ++= Seq(
  "com.sksamuel.elastic4s" %% "elastic4s-core" % elastic4sVersion,

  "com.sksamuel.elastic4s" %% "elastic4s-http" % elastic4sVersion,
)

データの登録

  • 登録対象のデータを持つ case class を定義します
  • Indexableを継承してcase classの内容を登録用のjsonに変換します
    この例では、elastic4sで定義されているObject Mapperを使って単純にjsonに変換しています
  • データの登録では、docに登録対象のデータを持つcase classを指定します
case class Data(id: Long, name: String)

implicit object SampleIndexable extends Indexable[Data] {

  override def json(t: Data): String = JacksonSupport.mapper.writeValueAsString(t)
}

private val client = ElasticClient(ElasticProperties("http://localhost:9200"))

client.execute {
  indexInto("sample" / "_doc").id("1").doc(Data(1, "sample1"))
}.await

データの検索

  • HitReaderを継承して検索結果の内容をcase classに変換します
  • 検索結果は、toをつかてcase classに変換して受け取ります
implicit object SampleHitReader extends HitReader[Data] {

  override def read(hit: Hit): Try[Data] = {
    Try(Data(hit.sourceAsMap("id").toString.toLong, hit.sourceAsMap("name").toString))
  }
}

val result = client.execute {
  search("sample") termQuery("name", "sample1")
}.await.result.to[Data]
println(result.headOption)

実行結果

登録したデータが検索できて、Dataクラスにマッピングできてるのが確認できます。

Some(Data(1,sample1))

IntelliJ IDEA 2019.1でのJUnit実行について…

IntelliJ IDEA 2019.1からはデフォルトではGradleでテスト実行されるようになったようです。

例えばテストを実行すると、こんな感じにGradleで実行されます。 f:id:sioiri:20190330074358p:plain

実行方法の設定変更方法

Settings -> Build, Execution, Deployment -> Build Tools -> Gradle -> Runner(↓の画面) から設定を変更します。 f:id:sioiri:20190330075733p:plain

設定内容はこんな感じになってます。

  • IntelliJでテスト実行したい場合は、Platform Test Runnerを選択します
  • テスト実行のたびに選択したい場合には、Chose per testを選択します
  • Gradleでテスト実行したい場合は、Gradle Test Runnerを選択します。

JUnit5&Gradle Test Runnerの組み合わせ

JUnit5を使っている場合、build.gradleにJUnit5用の設定がないとだめなので足してあげましょう。 Gradle&Junit5にあるように、build.gradleにいかが必要となります。

test {
  useJUnitPlatform()
}

Dockerコンテナ上で動いているJavaアプリケーションをIntelliJさんからデバッグしてみる

IntelliJ IDEA 2019.1 Release Candidate is Out! | IntelliJ IDEA Blogにあるように、 2019.1 からの新機能ですね。

Dockerfileの準備

デバッグ対象のアプリケーションをDockerで動かすためのDockerfileを作ります。
※docker-compose.ymlでもデバッグいけるみたいです。

とりあえず、デバッグできることだけを確認したいので、シンプルにこんな感じにしています。

FROM java:8

COPY build/libs/sample.jar .

CMD $JAVA_HOME/bin/java -jar sample.jar

実行構成の作成

  • 実行構成の追加からRemoteを選びます

f:id:sioiri:20190328085903p:plain

  • ポート番号やJavaのバージョンなどの設定を行います
    あとで必要になるので、Command line arguments for remote JVMの内容はコピーしておきましょう

f:id:sioiri:20190328090053p:plain

  • Before launchLaunch Docker before debugを選びます

f:id:sioiri:20190328090256p:plain

  • Launch Docker before debug の設定を行います
  • Custom Commandには、コピーしたCommand line arguments for remote JVMの内容を使ってリモートデバッグ可能な状態でアプリケーションを起動するようコマンドをを設定します((Custom Commandの設定、再度設定画面開くと消えちゃってますがおそらく設定自体は生きています))
  • 今回は、 java -agentlib:jdwp=transport=dt_socket,server=y,suspend=n,address=5005 -jar sample.jarと設定しています

f:id:sioiri:20190328090543p:plain

デバッグ実行してみる

こんな感じにコンテナ上で実行されているアプリケーションに対するデバッグが行なえます。 f:id:sioiri:20190328100035g:plain

・・・

Custom Command での上書き設定がちょっとめんどくさい感じですね

Spring Bootなアプリケーションのキャッシュの内容を定期的にクリアしてみる

@Scheduled アノテーションを使ってタスクを定期実行し、キャッシュの値を定期的にクリアしています。

設定値(application.properties)

  • 簡単に確認出来るインメモリキャッシュを設定しています
spring.cache.type=simple

サンプルコード

  • @Scheduled で10秒毎にキャッシュをクリアするタスクを実行しています
  • 同時に@CacheEvictを設定して、削除対象のキャッシュ名とすべてのエントリを削除するようにしています
@SpringBootApplication
@EnableCaching
@EnableScheduling
class CacheDemoApplication

fun main(args: Array<String>) {
    runApplication<CacheDemoApplication>(*args)
}

@RestController
@RequestMapping("/sample")
class SampleController(private val sampleService: SampleService) {
    val logger = LoggerFactory.getLogger(SampleController::class.java)
    @GetMapping
    fun toUpper(@RequestParam("value") value: String): String {
        logger.info("value: $value")
        return sampleService.toUpper(value)
    }

}

@Service
class SampleService {

    val logger = LoggerFactory.getLogger(SampleService::class.java)

    @Cacheable("toupper")
    fun toUpper(value: String): String {
        TimeUnit.SECONDS.sleep(1)
        val upper = value.toUpperCase()
        logger.info("$value --> $upper")
        return upper
    }
}

@Component
class SampleClearCache {

    val logger = LoggerFactory.getLogger(SampleClearCache::class.java)

    @Scheduled(fixedRateString = "PT10S", initialDelayString = "PT10S")
    @CacheEvict(value = ["toupper"], allEntries = true)
    fun clearCache(): Unit {
        logger.info("clear cache")
    }
}

実行結果

  • 初回はServiceが実行され、それ以降はServiceの実行が行われずキャッシュの値が使われていることがわかります
  • スケジュールなタスクでキャッシュのクリアが行われると、Serviceが実行されていることがわかります
  • スケジュールなタスクが指定された時間(10秒)毎に実行されていることがわかります
2019-03-23 07:28:07.930  INFO 26010 --- [nio-8080-exec-7] siosio.cachedemo.SampleController        : value: a
2019-03-23 07:28:08.931  INFO 26010 --- [nio-8080-exec-7] siosio.cachedemo.SampleService           : a --> A
2019-03-23 07:28:09.220  INFO 26010 --- [nio-8080-exec-8] siosio.cachedemo.SampleController        : value: a
2019-03-23 07:28:09.993  INFO 26010 --- [nio-8080-exec-9] siosio.cachedemo.SampleController        : value: a
2019-03-23 07:28:10.665  INFO 26010 --- [io-8080-exec-10] siosio.cachedemo.SampleController        : value: a
2019-03-23 07:28:11.680  INFO 26010 --- [nio-8080-exec-2] siosio.cachedemo.SampleController        : value: a
2019-03-23 07:28:12.399  INFO 26010 --- [nio-8080-exec-1] siosio.cachedemo.SampleController        : value: a
2019-03-23 07:28:13.220  INFO 26010 --- [nio-8080-exec-3] siosio.cachedemo.SampleController        : value: a
2019-03-23 07:28:14.013  INFO 26010 --- [nio-8080-exec-4] siosio.cachedemo.SampleController        : value: a
2019-03-23 07:28:14.820  INFO 26010 --- [nio-8080-exec-5] siosio.cachedemo.SampleController        : value: a
2019-03-23 07:28:15.703  INFO 26010 --- [   scheduling-1] siosio.cachedemo.SampleClearCache        : clear cache
2019-03-23 07:28:15.715  INFO 26010 --- [nio-8080-exec-7] siosio.cachedemo.SampleController        : value: a
2019-03-23 07:28:16.716  INFO 26010 --- [nio-8080-exec-7] siosio.cachedemo.SampleService           : a --> A
2019-03-23 07:28:17.837  INFO 26010 --- [nio-8080-exec-8] siosio.cachedemo.SampleController        : value: a
2019-03-23 07:28:20.011  INFO 26010 --- [nio-8080-exec-9] siosio.cachedemo.SampleController        : value: a
2019-03-23 07:28:25.703  INFO 26010 --- [   scheduling-1] siosio.cachedemo.SampleClearCache        : clear cache