しおしお

IntelliJ IDEAのことなんかを書いてます

Spring Cloud Configを使ってみる

Spring Cloud Configを使って、アプリケーションが使う環境毎に異なる設定値をちゃんと構成管理してみる。

Spring Cloud Configは、設定値をAPIで配信するConfig Serverが必要となる。アプリケーションは、Config Serverから環境に応じた設定値を取得して動作する感じになる。

Config Serverを作ってみる

Config Serverは、org.springframework.cloud:spring-cloud-config-serverを追加するだけで簡単に作成できる。
Gradleの場合はこんな感じになる。

dependencies {
  implementation('org.springframework.cloud:spring-cloud-config-server')
}

あとは、Spring Bootのアプリケーションと同じように起動クラスを作るだけで良い。
ポイントは、@SpringBootApplicationアノテーションだけではなく@EnableConfigServerをつけていること。

@EnableConfigServer
@SpringBootApplication
class ConfigServer

fun main(args: Array<String>) {
    runApplication<ConfigServer>(*args)
}

application.propertiesには、設定値が置かれたリポジトリの情報を設定する。

server.port=8888
spring.cloud.config.server.git.uri=git@bitbucket.org:siosio/config.git
spring.cloud.config.server.git.private-key=${key}
spring.cloud.config.server.git.passphrase=${pass}

設定値を保持するpropertiesファイルを作って、gitにpushする。
propertiesファイルの名前は、<アプリケーション名>-<プロファイル名>.propertiesとして、ルートディレクトリにおいておく。*1

今回は、application-dev.propertiesとしておく。

hello.message=hello!!!

設定値を使うアプリケーションを作ってみる

アプリケーション側には、spring-cloud-starter--configを追加する。あとは、Config Serverで管理している設定を変更した時にアプリケーション側の値をリフレッシュするためにspring-boot-starter-actuatorも追加しておく。

implementation 'org.springframework.cloud:spring-cloud-starter--config'
implementation 'org.springframework.boot:spring-boot-starter-actuator'

設定値を保持するコンポーネントを定義します。
これで、Config Serverから取得したhello.messageの値がmessageプロパティに保持されます。

@ConfigurationProperties(prefix = "hello")
@Component
class HelloProperties {
    lateinit var message: String
} 

Config Serverで管理している設定値が使えていることを確認するAPIを作ります。
Propertiesクラスで保持している設定値と、@Valueで直接設定値をインジェクションした場合の確認をします。

@RestController
@RequestMapping("/hello")
class HelloController(
        private val prop: HelloProperties,
        @Value("\${hello.message}") private val message: String
) {

    @GetMapping
    fun hello(): Res {
        return Res(prop.message, message)
    }
}

data class Res(
        val propMessage: String,
        val valueMessage: String
)

resources/bootstrap.propertiesを作成して、Config Serverの指定などをします。
spring.application.nameに、Config Serverのpropertiesファイル名に指定したアプリケーション名を設定します。
spring.cloud.config.uriに、Config Serverのuriを指定します。(デフォルトは、http://localhost:8888になっています)

spring.application.name=application
spring.cloud.config.uri=http://localhost:8888

動かしてみる

Config Serverのpropertiesファイル名に指定したプロファイル(dev)をアクティブにしてアプリケーションを起動します。

java -jar -Dspring.profiles.active=dev web-app-0.0.1-SNAPSHOT.jar

curlAPIを叩いてみると、Config Serverで管理されている値が返されることがわかります。

curl http://localhost:8080/hello
{"propMessage":"hello!!!","valueMessage":"hello!!!"}

Config Serverで管理されている設定値を変更し、アプリケーション側で設定値を再読込してみます。
設定値をmod hello!!!に変更してみます。

$ cat application-dev.properties 
hello.message=mod hello!!!

$ git commit -a -m mod
[master bed53e2] mod
 1 file changed, 1 insertion(+), 1 deletion(-)
git push origin master

actuatorのrefreshエンドポイントを叩いて、設定値を再読込します。
アプリケーション側には、再読込したよを示すログが出力されます。

$ curl -X POST http://localhost:8080/actuator/refresh
["config.client.version","hello.message"]

再度APIを叩いてみると、Propertiesクラスが持つ設定値は最新化されていますが、@Value でインジェクションした値は変わっていないことがわかります。

$ curl http://localhost:8080/hello
{"propMessage":"mod hello!!!","valueMessage":"hello!!!"}

@Valueでインジェクションした値も再読込したい場合は、下のように該当クラスに@RefreshScopeをつけてあげます。

@RestController
@RequestMapping("/hello")
@RefreshScope
class HelloController(
        private val prop: HelloProperties,
        @Value("\${hello.message}") private val message: String
)

@RefreshScopeをつけたことで、refresh後に@Valueの値も最新化されるようになりました。

$ curl http://localhost:8080/hello
{"propMessage":"mod hello!!!","valueMessage":"mod hello!!!"}
$ cat application-dev.properties 
hello.message=mod mod hello!!!

$ git commit -a -m mod
[master a468229] mod
 1 file changed, 1 insertion(+), 1 deletion(-)
siosio@siosio:~/IdeaProjects/temp/config$ git push origin master

$ curl -X POST http://localhost:8080/actuator/refresh
["config.client.version","hello.message"]

$ curl http://localhost:8080/hello
{"propMessage":"mod mod hello!!!","valueMessage":"mod mod hello!!!"} 

おわり。

*1:ファイルの命名規則は、 Spring Cloud Configを参照

VeeValidateで入力値のバリデーションをしてみる

VeeValidateのインストール

現時点の最新版は、2.1.3になります。

npm install vee-validate --save

VeeValidateをVueに追加する

import Vue from 'vue';
import VeeValidate from 'vee-validate';

Vue.use(VeeValidate);

入力フォームにバリデーションルールの設定とメッセージを表示してみる

  • バリデーションのルールはv-validate属性に指定する。指定可能なルールは、こちら
  • バリデーションエラーの表示は、errors.firstで引数には、バリデーション対象の項目のname属性の値を指定する
  • バリデーションエラーの有無は、errors.hasにname属性を指定することで確認できる
  • 複数のルールを設定する場合は、|で繋いで設定する
<form>
  <div>
    <input type="text" name='name' placeholder="名前" v-validate="'required'"/>
    <span v-if="errors.has('name')">{{ errors.first('name') }}</span>
  </div>

  <div>
    <input type="email" placeholder="メールアドレス" v-validate="'required|email'" name="mail"/>
    <span v-if="errors.has('mail')">{{ errors.first('mail') }}</span>
  </div>

  <div>
    <button @click="submit">登録</button>
  </div>
</form>

デフォルトでは、こんな感じに英語のメッセージが表示される
f:id:sioiri:20181118072642p:plain

メッセージを日本語化する

  • Validator.localizeを呼び出して、言語とそれに対応したメッセージを登録する
import VeeValidate, {Validator} from 'vee-validate';
import ja from 'vee-validate/dist/locale/ja';

Vue.use(VeeValidate);
Validator.localize('ja', ja);

この状態では、メッセージは日本語化されるけど対象の項目名は英語のままとなる
f:id:sioiri:20181118074005p:plain

項目名も日本語化する場合は、バリデーション対象の要素のdata-vv-as属性に項目名を設定する

<div>
  <input type="text" name='name' placeholder="名前" v-validate="'required'" data-vv-as="名前"/>
  <span v-if="errors.has('name')">{{ errors.first('name') }}</span>
</div>

<div>
  <input type="email" placeholder="メールアドレス" v-validate="'required|email'" name="mail" data-vv-as="メールアドレス"/>
  <span v-if="errors.has('mail')">{{ errors.first('mail') }}</span>
</div>

これでメッセージが完全に日本語になる
f:id:sioiri:20181118074746p:plain

このようにすると、グローバルに項目名を設定できる。グローバルに設定した項目名を上書きしたい場合には、上に書いたdata-vv-as属性を使うと良い

Validator.localize({
  ja: {
    attributes: {
      name: 'なまえ'
    }
  }
});

バリデーションが行われるイベントを変更する

デフォルトだとinputイベントでバリデーションが実行される。これを、他のイベントに変更することができます。inputだと、入力中にエラーメッセージが表示されたりしてちょっと鬱陶しい気がするので変更したほうが良さげかなと。

  • イベントは、VeeValidateを登録するときのオプションでeventsを指定することで変更できる
Vue.use(VeeValidate, {
  events: 'change'
});

サブミット時にバリデーションを実行する

サブミット時にはバリデーションが実行されないので、サブミット時に強制的にバリデーションを行うようにする。

  • バリデーションは、サブミット処理のメソッド内でthis.$validator.validate()を呼び出すと実行される
  • バリデーション結果は、引数で渡ってくるのでそれをもとにサブミットしていいのか判断すれば良い
  methods: {
    submit () {
      this.$validator.validate().then(result => {
        if (result) {
          alert('登録します');
        } else {
          alert('エラー');
        }
      });
    }
  }

カスタムバリデーションルールを作ってみる

  • Validator.extendの最初の引数にルール名、2番めにルールを設定するとカスタムルールを登録できる
Validator.extend('custom', {
  getMessage: (field) => {
    console.log(field);
    return `${field}の値が不正ですよ`;
  },
  validate: (value) => {
    return value === 1;
  }
});

結果はこんな感じになる。
f:id:sioiri:20181118172716p:plain

おわり。

IntelliJ IDEAのDatabase WindowからDoma2用Entityを生成する

IntelliJ IDEAのDatabase WindowsからDoma2用のEntityを生成してみたお話です。

IntelliJのデフォルトの状態だと下の画像のようにGenerated POJOsしか選択できません。ここに、Doma2用のEntityを生成するスクリプトを追加してEntityを生成できるようにします。
f:id:sioiri:20181004063440p:plain

Doma2のEntity生成用スクリプトIntelliJに登録する

DatabaseウィンドウからDoma2のエンティティテンプレートを生成するやつ · GitHubからGenerate Doma Entity.groovyをダウンロードして、IntelliJに登録します。
IntelliJへの登録は、下の画像のようにProjectウィンドウのScratches and Consolesの中のExtensions->Database Tools and SQL->schemaの中に配置するだけです。
f:id:sioiri:20181004083408p:plain

Entityを生成する

生成したいテーブルを右クリック->Scripted Extensions->Generate Doma Entity.groovyを選択します。保存場所を聞かれるので好きな場所を選びます。
f:id:sioiri:20181004090824p:plain

生成される内容

生成対象のテーブル定義
create table test_table
(
	id bigserial not null
		constraint test_table_id_pk
			primary key,
	name varchar(255) not null,
	age smallint not null,
	birthday date not null,
	created timestamp not null
)
生成されるEntity
package com.sample;

import org.seasar.doma.Entity;
import org.seasar.doma.Table;
import org.seasar.doma.Id;
import org.seasar.doma.GeneratedValue;
import org.seasar.doma.GenerationType;

@Entity(immutable = true)
@Table(name = "test_table")
public class TestTableEntity {
              
    @Id
    public final Long id;

    public final String name;

    public final Short age;

    public final java.time.LocalDate birthday;

    public final java.time.LocalDateTime created;

    public TestTableEntity(Long id, String name, Short age, java.time.LocalDate birthday, java.time.LocalDateTime created) {
        this.id = id;
        this.name = name;
        this.age = age;
        this.birthday = birthday;
        this.created = created;
    }

}

生成されるEntityで微妙なところ

  • パッケージ名がcom.sample固定なので、必ず変更が必要
  • PostgreSQLのserialが採番カラムとして判断できずGeneratedValueがつかない(他のデータベースの自動採番カラムは未確認)

おわり

Spring Cloud AWSで異なるリージョンにあるSESを使ってみる

Spring Cloud AWSのSESでアプリケーションとは異なるリージョンにあるSESを使う方法
*1

アプリケーションのリージョンの指定

リージョンの指定は、application.propertiesにこんな感じに設定します。

cloud.aws.region.auto=false
cloud.aws.region.static=ap-northeast-1

EC2のメタデータからとってこれる場合はこんな感じになります。

cloud.aws.region.auto=true

SES用のリージョンを設定するConfigurationの作成

アプリケーション用のリージョンを設定してしまうと、SESのAutoConfigurationもそのリージョン情報を使ってしまうので、強制的に別のリージョンを使うようにするConfigurationクラスを追加します。

MailSenderAutoConfigurationの実装を見ると、AmazonSimpleEmailServiceがBean定義されていない場合のみアプリケーションのリージョンを使ってAmazonSimpleEmailServiceClientを生成するようなので、Configurationクラス側でSES用のリージョンをもとにAmazonSimpleEmailServiceClientのBeanを定義してあげます。

@Configuration
public class SimpleEmailConfiguration {

    @Bean
   public AmazonWebserviceClientFactoryBean<AmazonSimpleEmailServiceClient> amazonSimpleEmailService(
            @Value("${aws.ses.region}") final String region,
            final AWSCredentialsProvider credentialsProvider) {
        return new AmazonWebserviceClientFactoryBean<>(AmazonSimpleEmailServiceClient.class,
                credentialsProvider, new StaticRegionProvider(region));
    }
}

SES用のリージョンを設定する

Configurationクラスが受け取るリージョン名をapplication.propertiesに設定します。

aws.ses.region=us-east-1

これでSpring Cloud AWSを使った場合でも、異なるリージョンにあるSESをサクッと使えるようになります。

*1:SESは東京リージョンにないので、アプリケーションを東京リージョンで動かした場合は必ず違うリージョンになってしまう

Dockerfile不要のコンテナビルダーのGradleプラグインを触ってみた

↓を見て便利そうなのでどんな感じなのかなと触ってみました。


gradleにプラグインを追加する

plugins {
  id 'com.google.cloud.tools.jib' version '0.9.2'
}

imageをビルドしてみる

imageのビルドはjibDockerBuildで行います。

./gradle jibDockerBuild

結果はこんな感じになりました。repositoryにはプロジェクト名が、tagにはバージョンが設定されるようです。
なんか、48年前に作成されたことになってますが↓のチケットと同件ですかね。

 ~ docker images  
REPOSITORY                     TAG                 IMAGE ID            CREATED             SIZE
jib-demo                       1.0.0               60f95e9fbe77        48 years ago        138MB

docker run --rm -p 8080:8080 jib-demo:1.0.0でさくっと起動できますね。

※48年前問題は、0.9.7のリリースで追加されたcontainer.useCurrentTimestampを使うことで、ビルド日時に変えられるようです。
build.gradleにこんな感じのものを追加するだけですね。

jib {
  container {
    useCurrentTimestamp = true
  }
}

Dockerfileを生成してみる

Dockerfileの生成はjibExportDockerContextで行います。

./gradle jibExportDockerContext

タスクを実行すると、build/jib-docker-context配下にDockerfileが生成されます。
内容はこんな感じでした。

FROM gcr.io/distroless/java

COPY libs /app/libs/
COPY resources /app/resources/
COPY classes /app/classes/

ENTRYPOINT ["java","-cp","/app/libs/*:/app/resources/:/app/classes/","siosio.jibdemo.JibDemoApplication"]
CMD []

Docker Hubにpushしてみる

build.gradleにDocker Hubの認証情報とimage名を設定してあげます。

jib {
  to {
    image = "siosio/${project.name}:${project.version}"
    auth {
      username = 'siosio'
      password = '********************************'
    }
  }
  
  container {
    jvmFlags = ['-Xms512m']
    ports = ['8080']
  }
}

pushは、jibタスクで行います。実行すると、pushしたよログが出力されます。

./gradle jib
***** 省略 *****
Container entrypoint set to [java, -Xms512m, -cp, /app/libs/*:/app/resources/:/app/classes/, siosio.jibdemo.JibDemoApplication]

Built and pushed image as siosio/jib-demo:1.0.1

Docker Hubにちゃんと上がってますね。
f:id:sioiri:20180710214843p:plain

pushしたimageを使ってさくっとアプリケーション動かせますね。

 ~ docker run --rm -d -p 8080:8080 siosio/jib-demo:1.0.1
35b36eb58dfce83e81525ab2364e52564f2de4697d3fbb706d7176b4a5d1b83d
 ~ curl http://localhost:8080
キタ─wwヘ√レvv~(゚∀゚)─wwヘ√レvv~─!!%   

imageのカスタマイズ

jibに対するオプションを設定することで、imageに対する設定が色々出来るようです。
例えば、こんな感じにbase imageを指定したり、外部公開するポートを指定したり出来るようです。

jib {
  from {
    image = 'openjdk:alpine'   // base imageの設定
  }
  container {
    jvmFlags = ['-Xms512m']   // jvmオプション
    ports = ['8080']   // 外部公開するポート
  }
}

詳しい使い方は、jib/jib-gradle-plugin at master · GoogleContainerTools/jib · GitHubを。。

SonarQubeの結果をUpsourceに連携してみた

External inspections support - Help | Upsource を参考にやってみました。

SonarQubeにUpsourceに連携するための拡張をインストールする

upsource-sonar-plugin-0.1-SNAPSHOT.jarをダウンロードして、
$SONARQUBE_HOME/extensions/pluginsにおいてあげます。
SonarQubeを再起動するとこんな感じに管理画面にUpsource Integrationが表示されます。
f:id:sioiri:20180522075811p:plain

Gradleなプロジェクトにもろもろの設定を追加する

Gradleのsonarqubeプラグインを導入します。

plugins {
  id "org.sonarqube" version "2.6.2"
}

SonarQubeの結果をUpsourceに連携するには、VCSのリビジョン番号が必要になるので、
build.gradleの中で以下のように取得してシステムプロパティにせっていして

def revision = 'git rev-parse HEAD'.execute().text.trim()
System.setProperty("sonar.upsource.revision", revision)

ドキュメントにあるように、Upsouceに連携するための情報をプロジェクト直下のgradle.propertiesに設定します。
revisionは、build.gradleで設定しているのでここでは設定不要です。

# sonarqubeの情報
systemProp.sonar.host.url=http://localhost:9000

# upsourceの情報
systemProp.sonar.upsource.url=http://localhost:8080
systemProp.sonar.upsource.project=test-app
systemProp.sonar.upsource.token=siosio
systemProp.sonar.analysis.mode=issues

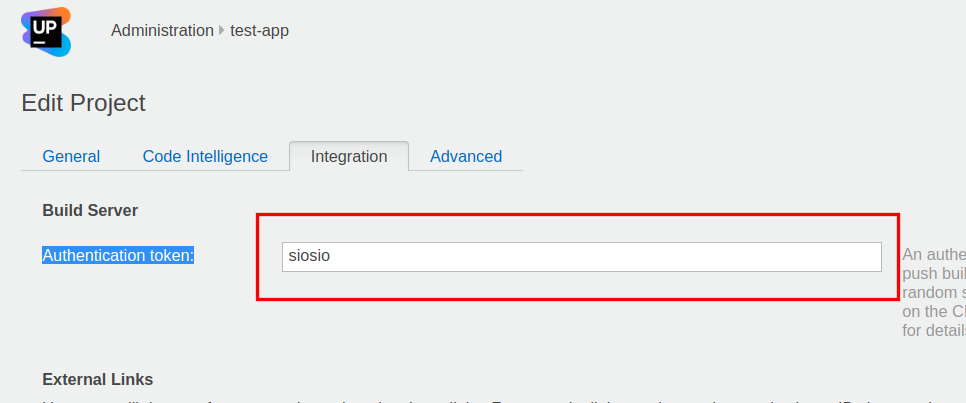
sonar.upsource.tokenには、UpsourceプロジェクトのintegrationタブのAuthentication token(下の画像の赤枠の部分)に設定した値を指定します。
デフォルトだとAuthentication tokenには何も設定されていないので適当な値を指定しましょう。
f:id:sioiri:20180522195153p:plain

動かしてみた結果

こんな感じにSonarQubeさんに指摘されるようなのを作ってみました。

package siosio;

import java.util.*;

public class Hoge {

    private static final String HOGE = "HOGE";

    public static void main(String[] args) {
        String hoge = null;
    }
}

実行するとsonar.analysis.mode=issuesが非推奨だよと言われるけど、Upsourceへの連携は成功しています。

> Task :sonarqube
The use of the issues mode (sonar.analysis.mode=issues) is deprecated. This mode will be dropped in the future.

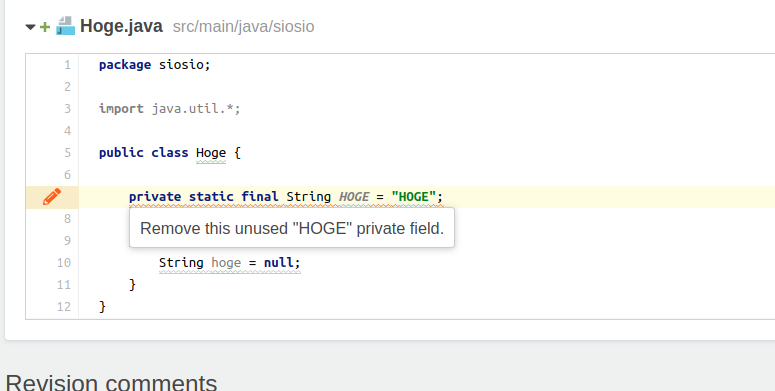
Upsourceで確認すると、IntelliJさんのInspection結果と同じような感じに表示されます。
f:id:sioiri:20180523075238p:plain

Upsource側ですべて確認できるのなかなか良さそう。

AWS Secrets Managerの値をSpring Bootでいい感じに使えるようにした

AWS Secrets Manager | シークレットをローテーション、管理、取得 | アマゾン ウェブ サービス (AWS)に保存した値を、アプリケーションの設定値として使えるようにしてみた。
例えば、 @Valueを使って、Secrets Managerの値を設定したりできる感じ

作ったもの

EnvironmentPostProcessorの実装クラスを作って、Secrets Managerの値を最も優先して使えるようにしています。*1

ソースコードGitHub - siosio/spring-cloud-aws-secrets-manager

使ってみる

spring-cloud-aws-secrets-managerは公開していないので、git cloneしてMavenローカルリポジトリにインストールしてからDependenciesに追加してあげます。
Gradleの場合は、こんな感じになります。

  runtime 'com.github.siosio:spring-cloud-aws-secrets-manager:1.0.0'

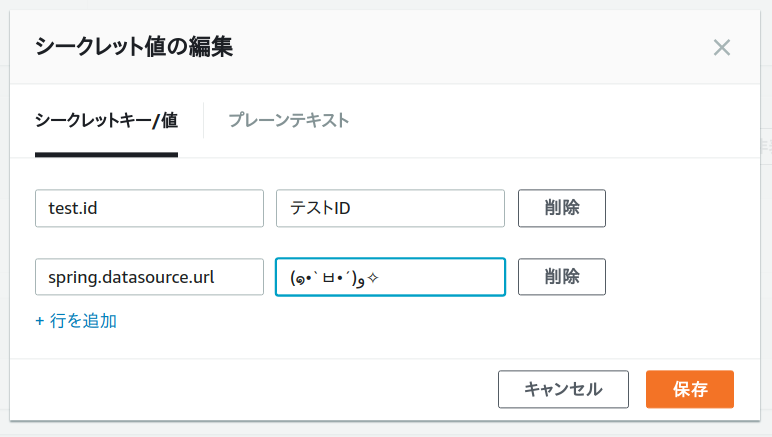
Secrets Managerに値を登録する。今回は動いていることを確認しやすくするためにspring.datasource.urlにでたらめな値を設定してみてます。
f:id:sioiri:20180428071232p:plain

アプリケーションを実行する前にAWSの認証情報を設定してあげます。環境変数の場合はこんな感じになります。

export AWS_ACCESS_KEY_ID=your_access_key_id
export AWS_SECRET_ACCESS_KEY=your_secret_access_key

実行すると、こんな感じにjdbcUrlがダメだよとエラーになるので、Secrets Managerの値を参照して動いているのがわかります。
Dependencies追加するだけで、Secrets Managerの値がさくっと使えるのはちょっと便利かもしれない。

org.springframework.beans.factory.BeanCreationException: Error creating bean with name 'flywayInitializer' defined in class path resource [org/springframework/boot/autoconfigure/flyway/FlywayAutoConfiguration$FlywayConfiguration.class]: Invocation of init method failed; nested exception is java.lang.RuntimeException: Driver org.h2.Driver claims to not accept jdbcUrl, (๑•̀ㅂ•́)و✧

残念なところ

Spring Cloud for Amazon Web Servicesとセットで使うことができないです。
spring cloud awsの最新版(2.0.0.RC1)が依存しているAWS SDKのバージョンがSecrets Manager SDKのバージョンよりだいぶ古いのが原因です。

おわり。

*1:73. Spring Boot Applicationを参考に作りました